syllabus — ART 394 — PROFESSIONAL PRACTICE
IN THE STUDIO
Camera Settings
for Documentation Photos
All DSLR
cameras are different, according to brand, model and features so you will want
to learn how to set up and use your camera by reading the user’s manual, taking
a class, or watching a tutorial video. The following points are general
guidelines.
For best
results, ALWAYS use a tripod (to
minimize blur and reduce angle distortions) and an even lighting source like multiple photo lights or shoot outside
on an overcast day.
File Format
It is best
to shoot in the RAW format when documenting artworks, but you can also use the
highest quality JPG format available on your camera. Some cameras allow you to
shoot in RAW and JPG formats at once; each shot will result in two files. NOTE:
RAW files are enormous, so make sure you have enough storage on your SD card.
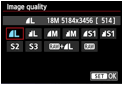 “RAW+L” is a RAW file and also a large quality
JPG
“RAW+L” is a RAW file and also a large quality
JPG
Focal Length
Use what is
called a “normal” focal length lens (50 to 55 mm). Wide-angle lenses (less than
24mm) will distort your image, making it appear curved or fish-eyed. A long
focal length (more than 70mm) is considered a telephoto and reduces the amount
of light available to the sensors.
A zoom lens (adjustable focal length) should be set to the normal range.
Focus
Choose
between auto focus and manual focus. In most cases, auto focus works well.
ISO (International Standards Organization)
The ISO
determines the sensitivity of the film/digital sensors. Low ISO (100) captures
fine detail but needs a lot of light. High ISO (1600) needs less light but can
have more grain or digital “noise.” A tripod will allow a shutter to open
longer without blurry movement, so more light can get in; this allows you to
use a lower ISO than hand-held. Low ISO of 100 is ideal, 200 is great, and 400
will also work.
Shooting Mode
Manual mode
(M) is the least automated and is best if you know exactly how to set your
camera. On the other hand, the Full Automatic mode gives you very little choice
as to how the shot will appear. In general use the Aperture Priority mode (A or
Av on most cameras) to have manual control over the aperture setting (also
called f-stop); as you change the f-stop, the camera selects the correct
shutter speed to give you a good exposure.
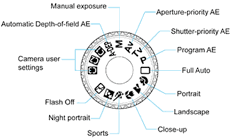 For flat work, choose Av and set it f4.5-f10
Shutter Speed (fractions of a second) & Aperture
(F-stop)
The shutter speed
and aperture work in combination to control how much light enters the camera.
A long
shutter speed (1/30 sec) lets in more light; a short shutter speed (1/1000 sec)
lets in less. A long shutter speed is better in low light but creates more blur
if there is any movement (which is why a tripod is crucial). A short shutter
speed is great for photographing moving things (as opposed to still artwork) or
if you don’t have a tripod, however you will need much more light.
The aperture
is the actual opening in the lens, and is measured in f-stops. A low number (f4.5) means a wide opening and a high number
(f22) means a small opening. The higher the number (smaller opening) the
greater the depth of field. A lower number (wide opening) has a narrow depth of
field so objects in front of or behind your artwork may be blurry. For shooting
flat artwork, a low to mid-range f-stop (f4.5 – f10) works well. 3D artwork should use between f8 –
f13. Avoid using a high f-stop (f22 – f32), as this can cause lens diffraction
(slight distortion of color or focus).
Storage
Use a multi-GB
photo-quality SD card for the best results. The higher the MB/sec the better.
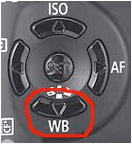
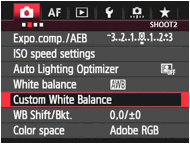
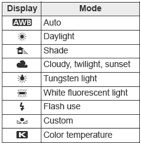
White Balance
Set the
white balance to correspond to the kind of lights you are using. Light has a
range of color temperatures that alter the appearance of a white surface.
Uncorrected tungsten/incandescent lights have a yellow cast, fluorescent light
has a green cast, and daylight is bluish. Auto white balance (AWB) can be used
but is not always reliable. White balance can also be corrected in
post-production (Photoshop or Lightroom), but it’s always best to start with a
good photograph. Try not to mix light colors by turning off extra lights that
do not match.